Shader Color |
View code on Gitlab |
Summary
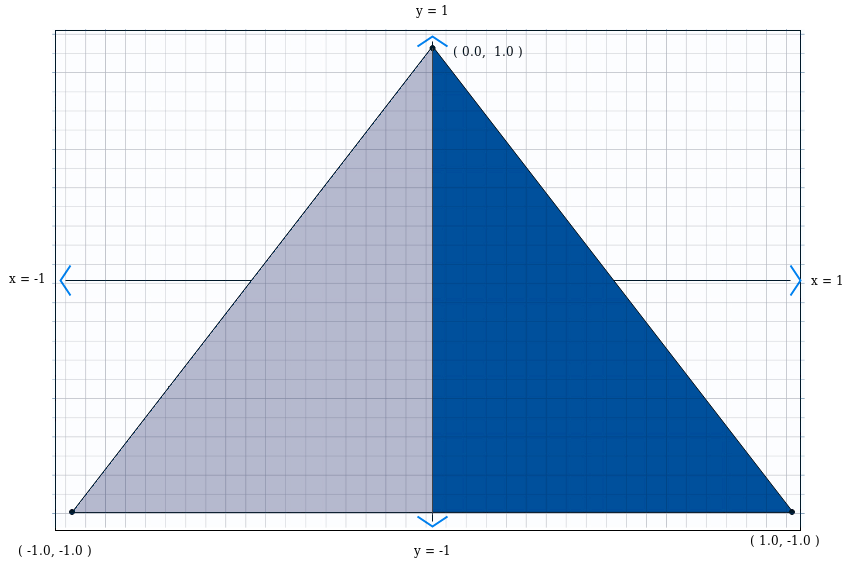
We've been drawing different shapes with a single color and passing them in the fragment shader. In this article we write some logic in our fragment shader to split the color into two tones based on the x-position of the pixel being drawn, in order to demonstrate how effects can be written into shaders. The output for this article is given below.

In the previous articles we've been focusing less on shaders and more on the mechanics of drawing because there are a lot of concepts to be confortable with the be able to draw some basic shapes to the screen. In this article we're going to change direction and start looking into the other aspect of working with OpenGL, namely the shaders. And in this chapter specifically the fragment shader. Let's take a quick look at the vertex shader and fragment shader from the first article where we draw a blue triangle.
attribute vec3 vertex;

void main(void) {
	gl_Position = vec4(vertex, 1.0);
}
Above is the vertex shader, and the fragment shader is written below.
void main(void) {
	gl_FragColor = vec4(0.0, 0.0, 1.0, 1.0);
}
So what happens when we draw a triangle using this shaders, is the vertex shader will first mark out a trianglular area defined by the coordinants, (0.0, 1.0), (-1.0, -1.0), and (1.0, -1.0). Once that area is marked out, the fragment shader and will proceed to color in each pixel inside that area based on the rules defined in the fragment shader. So in this case we only have the rule gl_FragColor = vec4(0.0, 0.0, 1.0, 1.0) which will always set each pixel in the triangle to blue.
So in this chapter we will try to make a simple proof of concept where we write rules to the fragment shader to generate a pattern that's fixed solid color like we've been using in the previous chapters. In this case we will use the example of painting one half of the triangle white, and one haf of the triangle blue depending on the x-axis location of the pixel being drawn. Let's take a look at the frgament shader for this chapter.
void main(void) {

	if(pos < 400) {
		gl_FragColor = vec4(1.0, 1.0, 1.0, 1.0);
	} else {
		gl_FragColor = vec4(0.0, 0.0, 1.0, 1.0);
	}

}
I can't say if this is actually a good idea in practical application. Most of the sites I've found for OpenGL generally don't recomend putting if statements into the shader. But the purpose of this article is intended to be instructive to demonstrate how the fragment shader works. In this case we look for the x coordinate of the pixel being drawn and draw a white pixel if the x pixel coordinate is less than 400 pixels across the screen and blue otherwise. In this case the author is using a PiHat with a resolution of 800x480, but if you're using a monitor with a different resolution, you may probably need to change this number from 400 to something in the middle if your screen.

Review
This article was intended to be a short and sweet introduction to the fragment shader to show how we can write logic to describe how OpenGL is supposed to color in a triangle. When OpenGL colors in a triangular area, it will go one pixel at a time and run the fragment shader code for each pixel being drawn. When we do that we can assign rules that define a specific color for that pixel. In this example we simply split the triangle in two, but for a challenge you can try writing a fragment shader that splits the triangle into four, or has stripes. In the next shapter we will describe how to pass attributes from the vertex shader into the fragment shader to define shading.
